How to install Yoffix Rooms Add-in for Microsoft Outlook
The Yoffix Rooms Add-in for Microsoft Outlook allows you to search and book meeting rooms directly inside your Outlook calendar.
It helps you find the right room faster and keeps all room bookings synchronized with Yoffix and Microsoft 365.
What the Outlook Add-in Does
Once installed, the Yoffix Outlook Add-in allows you to:
Search available meeting rooms directly in Outlook
Filter rooms based on availability
Book rooms without switching to another tool
Synchronize room bookings with Yoffix in real time
This ensures consistent room scheduling across Outlook and your Yoffix workspace.
How the Outlook Add-in Works
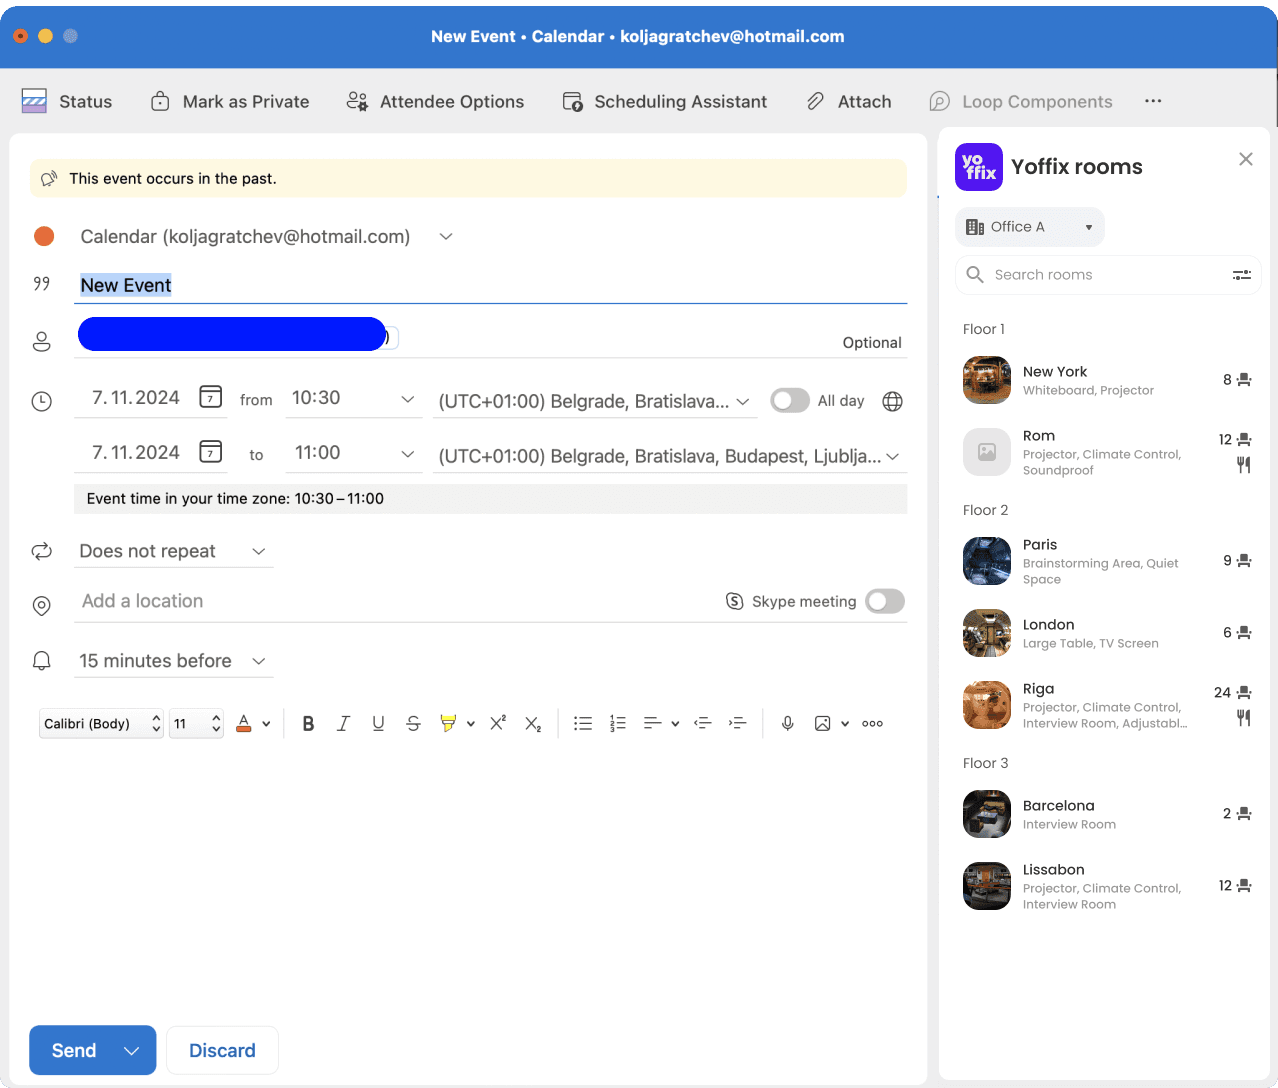
The Add-in is integrated into your Outlook calendar interface.
When creating or editing a meeting:
Open the Yoffix Add-in
Search for available rooms
Select and reserve the room
Save the meeting
The booking is automatically synchronized with Yoffix.
How to install Yoffix Rooms Outlook add-in
Before you start
You need the Yoffix Rooms manifest file. You can use the file received from Yoffix, or download it directly: https://ms-rooms-app.yoffix.com/manifest.prod.xml
Make sure you're signed in to Outlook and your browser with the same Microsoft 365 account.
Manual installation is done through Outlook on the web, even if you normally use new Outlook or classic Outlook on Windows.
If your organization uses a separate Microsoft 365 setup, a Microsoft 365 admin needs to complete Step 1 before anyone can use the add-in.
Step 1. Admin approval
A Microsoft 365 admin needs to approve the Yoffix app for your organization before users can use the add-in. To do this, the admin opens the link below and follows the prompts:
Approve Yoffix for your organization
After approval, the admin is redirected to a Yoffix confirmation page.
Notes:
This must be done by a Microsoft 365 admin, not a regular user.
It only needs to be done once per organization.
If the approval window shows an error or access denied, contact Yoffix support.
Step 2. Install the add-in
Save the manifest file to your computer. Download the latest version here: https://ms-rooms-app.yoffix.com/manifest.prod.xml
Open this link in your browser: https://aka.ms/olksideload
Sign in to your Microsoft 365 account if prompted.
In the Add-Ins for Outlook window, select My add-ins.
Under Custom Add-ins, select Add a custom add-in.
Choose Add from File.
Select the manifest file you downloaded.
Click Install.
Refresh Outlook on the web.
If you use the desktop app, close and reopen Outlook.
Step 3. Find the add-in after installation
Open or create a calendar event in Outlook.
The add-in appears as Yoffix Rooms or Open Yoffix Rooms.
In new Outlook or Outlook on the web, look in the event toolbar or under Apps / More apps.
In classic Outlook, open the meeting or appointment in a separate window if needed, then check the ribbon or All Apps.
If installation is blocked
Some organizations restrict add-ins installed by individual users. If you don't see Add a custom add-in or Add from File, contact your Microsoft 365 admin.
If the add-in opens but sign-in fails, confirm that the admin approval in Step 1 has been completed.
If the add-in installs but won't open, your organization may need to allow access to the following addresses:
If you need help
Please send us:
A screenshot of the step where the issue appears
Which version of Outlook you're using (Outlook on the web, new Outlook, or classic Outlook)
The email address of the mailbox where you're trying to install the add-in
Whether the admin approval step has been completed
Why Use the Outlook Add-in?
Using the Yoffix Outlook Add-in allows you to:
Book meeting rooms without leaving Outlook
Reduce booking conflicts
Improve room visibility and availability
Keep Microsoft 365 and Yoffix fully aligned
It completes your Microsoft 365 integration and streamlines workplace scheduling.
For more details, contact our support team.